Nest Maker technical description.
Nest Maker questions and answers.
Q&A->How to change Scrap to Rest for rest plates.
Q&A->How to change material density.
Q&A->How to Import/Export XML.
Q&A->Production status to Nupas.
Q&A->Selection group of parts with shift button.
Q&A->Variables available for reports.
Q&A->Variables available for sketches.
Q&A->Variables available in Project.inf file.
Q&A->How to create new project.
About Nest Maker
Main window
Edit window
Menu
File
File->Open
File->Add
File->Save
File->Save as
File->Language
File->Quit
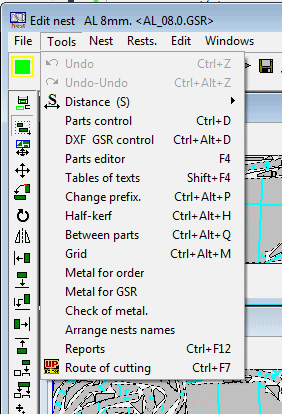
Tools
Tools->Undo
Tools->Redo
Tools->Distance
Tools->Parts control
Tools->DXF GSR Control
Tools->Tables of text
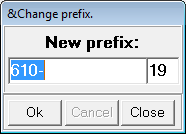
Tools->Change prefix
Tools->Half-kerf
Tools->Between parts
Tools->Grid
Tools->Metal for order
Tools->Metal for GSR
Tools->Check of metal
Tools->Arrange nests names
Tools->Reports
Tools->Route of cutting
Nest
Nest->New plate
Nest->Autonesting Omega
Nest->Nesting for one plate
Nest->Parameters for Omega nesting
Nest->Rasters nesting for one plate
Nest->Rasters nesting
Nest->Parameters
Nest->In rectangle
Nest->Rectangle nesting
Nest->Rectangle nesting for one plate
Nest->Number of nest copies
Rests
Rests->Rectangular
Rests->Edit
Rests->Registration
Rests->Registration all
Rests->Delete
Rests->Where is occupied
Rests->Auto rests
Rests->Min size
Rests->List
Rests->Minimal plates
Edit
Edit->Up to the edge
Edit->Move to stop
Edit->Pack
Edit->Copy
Edit->Remove
Edit->Combine
Edit->Combine#
Edit->Split
Windows
Windows->Where is error
Windows->Parts
Windows->Materials
Windows->In same scale
Release and development history.
PDF/NestMakerPresentation.pdf
Nest Maker questions and answers.
In this part we will try to collect questions and answers from our customers.
To top.
Q&A->How to change Scrap to Rest for rest plates.
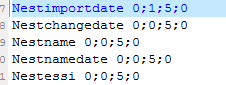
In file PathProject\ProjectSet\Project.inf
for rests registration:
RecScrap=Rest //Name of rest for identification
ScrapOutOrdNum=false //Order number in rest identification
ScrapOutPrjNum=false //Project number in rest identification
ScrapOutSrtNum=false //unique rest number in rest identification
ScrapOutMass=false //rest mass in rest identification
ScrapOutArea=false //rest area in rest identification
ScrapPrintDest=false //For NC Maker - specify where rest is used in rest identification
for reports:
NestedIn=Nested in Rest(Turn) //Identification of nests on rests
MinPlate=Minimal plate //Identification of nests on minimal plates
Fractional=[.] from (length|width) of a plate [B]x[A] //Identification of plates
dimensions
OrdInFilRep=false //Order number in reports file names
OrderInReport=false //Order number in reports header
To top.
Q&A->How to change material density.
It is possible to change density form table before any of plates of this type is
used in nesting.
if plates has been used for nesting it's possible to change density in the file
PathOrder\OrderSet\Sheets.csv:
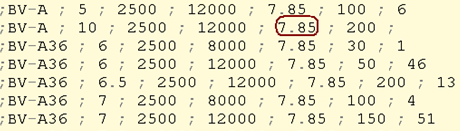
Please note! In this case all previously nested parts will have previous value
of density in reports. To have correct values reports must be re-exported. For new
nested parts all information will be corresponded with new value.
To top.
Q&A->How to Import/Export XML.
XML file is used to provide data exchange between Nest Maker and Nupas.
For Import/Export XML in file PathProject\ProjectSet\Project.inf should be following
records:
InpNestsXMLfile= PathProject\.\Reports\nest_. // XML file from NUPAS
OutNestsXMLfile= PathProject\.\Reports\nest_. // XML file from Nest Maker
The name of XML files without extension. Nest Maker will replace "." symbol in the
name variable into unit number. XML file from Nupas must be created before making
reports in Nest Maker. XML file from Nest Maker will be created during report generation
process. To get more information about XML link to Nupas please read
Q&A->Production status to Nupas.
To top.
Q&A->Production status to Nupas.
Encoding: UTF-8
Production status to NUPAS example XML:
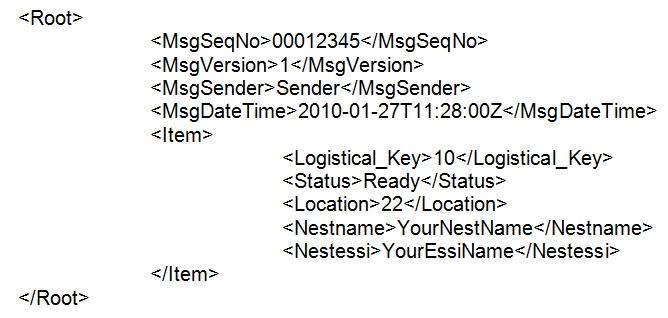
It is enough to use the Logistical_key, but it have to have a relation with the
real Nupas-Cadmatic Hull part. Assume that the status, Nestname and the other items
can send to Nupas as well by using the standard XML import. See current default
database names related to nest information below. The logistical field have to be
editable, but our standard fields which are related to a field Type can’t be changed
by the logistical layout function.
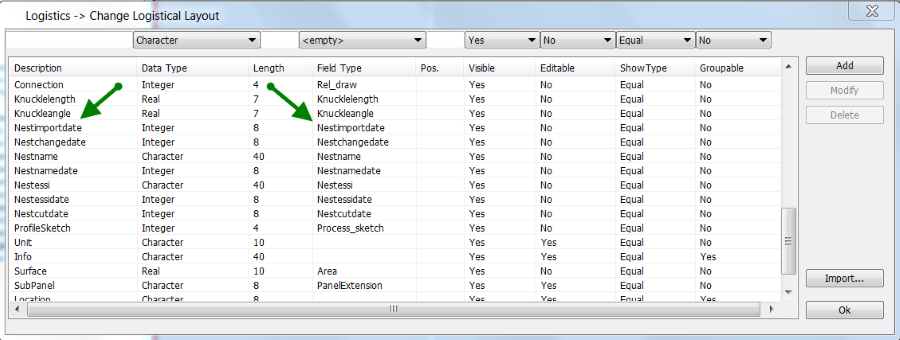
In case you like to use these standard field you have to change the db.cfg file
present in the ncgdb manually. This by changing the second row with the value 1
or you can make the Field Type empty.
To top.
Q&A->Selection group of parts with Shift button.
Group of parts selected with Shift button will be kept selected until user
press Escape button. In addition to usual correction commands, addition correction
menu will be available.
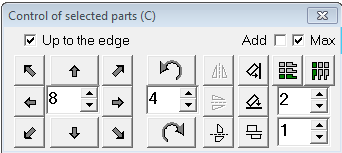
This is very useful for manual correction of the layout.
Q&A->Variables available for reports.
        --------------------------------------------------------------
        Parts
        --------------------------------------------------------------
        String PosN          - Parts number
        String Drawing       - Drawing number
        String SecNum        - Unit number
        String Order         - Order number
        Int32  Quantity      - Quantity
        Int16  Block         - Block number
        String Comment       - Comment
        Int32  Nested        - Number of the nested parts
        String File          - Full part’s name
        String Material      - Type of material
        double Thickness     - Thickness
        double Ro            - Material Density
        double Area          - Part’s area
        double Mass          - Part’s Mass
        double Width         - Maximum width
        double Height        - Maximum height
        double Width mm       - Maximum width in mm.
        double Heihht mm      - Maximum height in mm.
        String NestList      - Part’s nests names
        String QuantList     - Quantity in nests
        String GSRList       - GSR names
        String ErrorQuantity – Quantity error (nested more or less than necessary)
        String GSRname       - GSR name
        String GSRfile       - GSR file name

        --------------------------------------------------------------
        Nests
        --------------------------------------------------------------
        double S_Xolp       - Total length of the rapid traverse in m.
        double S_Rezk       - Total cutting length in m.
        double S_Razm       - Total marking length in m.
        double S_Perem      - Total jumpers length for manual cutting in m.
        double S_Most       - Total bridges length for manual cutting in m.

        Int32  S_Nprob      - Number of punching.
        Int32  S_Nrazm      - Number of the processing marking lines.
        Int32  S_Nlabl      - Number of the processing text’s lines.
        Int32  S_Nsimv      - Number of the symbols in text.
        Int32  S_Nperem     - Jumpers number.
        Int32  S_Nmost      - Double number of the bridges.
        Int32  S_ErrRas     - Nest error indicator (-1 with errors, 0 not checked, 1 without errors)
        bool   S_AllRez     - Cutting route completely defined
        bool   S_AllMrk     - Marking route completely defined
        bool   S_NoEdit     - No changes after root making
        double Ro           - Material Density
        String Name         - Nest name
        double Length       - Plate length
        double Width        - Plate width
        String Material     - Type of material
        double Thickness    - Thickness
        double CoefficientN – Nesting coefficient decimal
        double CoefficientP - Nesting coefficient in percentage
        double MassParts    - Total mass of the all parts in nest
        double MassPlate    - Plate mass
        double MassScraps   - Mass of the rests on the nest
        Int32  Quantity     - Quantity
        bool   PartPlate    - Nested on piece of the plate
        double PartLength   - Piece length
        double PartWidth    - Piece width
        String Comment      - Comment
        bool   OnScrap      - Nested on the rest
        Int32  OnScrapNum   - Rest number
        String OnScrapPrj   - Rest project number
        String OnScrapOrd   - Rest order number
        String OnScrapSec   - Rest unit number
        String OnScrapGsr   - Rest in GSR
        String OnScrapNst   - Rest on nest
        bool   OnScrapRot   - Rotated rest
        String NCfile       - NC file name
        String NCformat     - NC format file name
        String NCdateOut    - NC produced date
        String GSRname      - GSR name
        String GSRfile      - GSR file name

        --------------------------------------------------------------
        Rests
        --------------------------------------------------------------
        String Nest      - Nest name for rest source
        String File      - GSR name for rest source
        String SecNum    - Unit name for rest source
        String Typ       - Rest type (reserved)
        Nnt32  Number    - Rest number
        double Length    - Rest length
        double Width     - Rest width
        String Material  - Rest type of material
        double Thickness – Rest thickness
        double Ro        - Rest density
        bool   Occupied  - Mark as occupied
        String Where     - Where rest occupied
        double Mass      - Rest mass

        --------------------------------------------------------------
        Sheets
        --------------------------------------------------------------
        Int32  Quantity  - Plate quantity
        Int32  Length    - Plate length
        Int32  Width     - Plate width
        String Material  - Plate type of material
        double Thickness – Plate thickness
        double Ro        - Plate density
To top.
Q&A->Variables available for nest sketch.
        [M]Material
        [r]Density
        [T]Thickness in mm.
        [X]Gross plate length in mm.
        [Y]Gross plate width in mm.
        [x]Length dimensions of the nest in mm.
        [y]Width dimensions of the nest in mm.
        [Q]Nests quantity
        [S]Block number
        [B]Order number
        [Z]Project name
        [G]File name of GSR
        [N]Nest name
        [n]Name NC
        [F]Post processor name NC
        [D] Date of record NC
        [R]Nested on rest
        [U]Nest contain registered
        [K]Nest coefficient with rests %
        [k]Nest coefficient without rests %
        [V]Total parts weight in kg.
        [v]Gross plate weight in kg.
        [b]Gross plate area sq.m.
        [O]Rests weight in kg.
        [W]Kerf width (this side)
        [w]Kerf width (other side)
        [H]Burning metal weight
        [P]Scrap weight
        [C]Material usage coefficient % (parts weight + rests weight + burning metal weight)/gross plate weight
        [o]Rests area sq.m.
        [A]Parts number
        [a]Number of penetrations
        [c]Cutting length in m
        [l]Number of marking lines
        [m]Marking length in m
        [f]Rapid traverse length in m
        [d]Number of ridges
        [e]Ridges length in m.
        [g]Double number of bridges
        [h]Length of bridges cuts in m.
        [i]Total number of cuts for removing bridges and ridges
        [j]Total cut length for removing bridges and ridges
        [p]Number of text elements
        [q]Number of symbols in text elements
        [$Nnn]Number in table
        [$Pnn]Part number on the drawing
        [$Cnn]Drawing number
        [$Onn]Order number
        [$Snn]Unit number
        [$Rnn]Part description
        [$knn]Parts quantity nested on the current nest
        [$Knn]Part total quantity
        [$Ann]Part area in m2
        [$Vnn]Part weight in kg
        [$Wnn]Part overall length in m
        [$Hnn]Part overall width in m
        [$wnn]Part overall length in mm
        [$hnn]Part overall width in m
        [$Mnn]Part marking lines total length in  m
        [$mnn]Part marking lines total length in mm
To top.
Q&A->Variables available in Project.inf file.
        Mirror=true|false       //Canting for DXF parts import
        MirrorAll=true|false    //Canting loaded parts
        KorrCurve=true|false    //Geometry correction during DXF import
        ColorCurve=true|false   //Use color for type of lines detection Inner/Outer contours, marking.
                                //Useful when all lines have same layer in DXF
        MultiSec=true|false     //Import parts for several units at same time
        ChangeMT=true|false     //Allow to load parts without material type and thickness description
        RazLayers=Layer1,Layer2;//Definition marking layers for import from DXF
        TxtLayers=Layer1,Layer2;//Definition text layers for import from DXF
        MinGabRest=BxA          //Minimal overall dimensions for rests
        OrientRest=true|false   //Rests orientation
        NestInHoles=true|false  //Auto-nesting in holes
        NestBaseTop=true|false  //Auto-nesting to upper edge of the plate
        NestBaseInd=I           //Nesting type index 0 - to corner, 1 - to lower or upper edge,
                                //  2- to left edge
        LengthyBars=true|false  //Horizontal nesting for flat bars
        MinHBars=H              //Min higth for flat bars detection
        ABkfBars=kf             //Coefficient for flat bar detection kF = Length/Hight
        SortRazmetka=true|false //Use marking liners for parts sorting
                                //( if true all parts with marking will be in end of parts list.)
        CommonCutting=true|false//Common cutting
        CutPFile=FileName       //File name for cutting parameters
        NoChangeCutP=true|false //Block changes in cutting parameters file
        AutoRoutTxt=true|false  //Auto route for texts
        AutoRoutMrk=true|false  //Auto route for marking
        AutoRoutAll=true|false  //Auto route for text, marking and cutting
        OutBeforeIn=true|false  //Cut inner contours before outer contour
        OtherDirect=true|false  //Opposite direction for cutting inner and outer contours
        AutoIn=true|false       //Auto nesting for inner contours when outer contour nesting manually defined
        AutoInBr=true|false     //Auto nesting for parts in inner contours with bridges
        DxfOutFormat=true|false //Output DXF nests files in sketch
        DxfOutPicture=true|false//Out DXF file with more readable texts
        FormatSize=AxB          //Sketch size
        MaxHsimDXF=H            //Maximum text hight in DXF
        FreeOutNc=true|false    //Output of NC files in any selected folder
        MinPlate=Minimal plate [B]x[A]  //Minimal plate identification [A] - Length, [B] - width
        Fractional=[.] from (length|width) of a plate [B]x[A]Rest //Nest identification for part of gross plate
                Parameters:
                    [A] - Length of gross plate
                    [B] - Width of gross plate
                    [.]	- used part of list
                    [%]	- percentage of gross plate
                Examples:
                     25% from length of a plate 2500x8000
                     0.3 from width of a plate 2500x8000
        RecScrap=Rest           //Rest identification on the nests
        NestedIn= Nested in Rest  //Rest identification of nests. Example: Nested in rest 3 104-35
        ChNameOnScrap=true|false  //Changing nest name with used rest
        DelScrapNotFSec=true|false//Delete rests form list if unit is not exist
        ScrapOutOrdNum=true|false //Use order number in rest marking
        ScrapOutPrjNum=true|false //Use project number in rest marking
        ScrapOutMass=true|false   //Use rest weight in rest marking
        ScrapOutArea=true|false   //Use rest area in rest marking
        ScrapPrintDest=true|false //Output to DXF where the rest is used
        ScrapOutSrtNum=true|false //Unique rest identification
        InpNestsXMLfile=Path    //Path to XML file for import
        OutNestsXMLfile=Path    //Path to XML file for export
        OrdInFilRep=true|false  //Order number in reports
        RusTemplates=true|false //Report template on Russian language
        GabBigPart=BxA          //Minimal part size for routing with another bridge thickness
        GabBigPart=S            //Another bridge thickness
        PlaneTxtDxf=false       //Output text in DXF in plate plane.
        SortParts=2             //Parts sorting in table (0-by drawing, 1-by wight,
                 2-by overall length, 3-by overall with)-0,-1..by parts order
        //Layer and colors for DXF:
        LayPlate=Plate;5        //Layer and color for plate rectangle
        LayRest=Plate;5         //Layer and color for rest rectangle
        LayIdRest=Plate;7       //Layer and color for rest text
        LayOutSide=OUTSIDE;7    //Layer and color for part's outer contour
        LayInSide=INSIDE;8      //Layer and color for part's inner contours
        LayRazm=MARKING;4       //Layer and color for marking lines
        LayOrient=MARKING;3     //Layer and color for orientation arrows
        LayTxtId=TXTID;7        //Layer and color for part's identification text
        LayTxtOr=TXTMARK;4      //Layer and color for orientation text and marking identification
        LayTxtAr=Arrow;2        //Layer and color for text orientation arrows
        LayTxtOt=TXTTXT;8       //Layer and color for other texts
        LayCutWay=CutWay;10     //Layer and color for cutting sequence
        LayMrkWay=MrkWay;151    //Layer and color for marking sequence
        LayGrnWay=MrkWay;152    //Layer and color for graining sequence
        LayTxtWay=TxtWay;153    //Layer and color for texts printing
        LayIdlWay=IdleWay;9     //Layer and color for rapid traverse sequence
        LayDirect=CutDirect     //Layer and color for cutting and marking directions arrows
        LayCutNum=CutNum        //Layer and color for cutting sequences text numbers
        LayMrkNum=MrkNum        //Layer and color for marking sequences text numbers
        HideLayers=IdleWay;TxtWay //Hidden layers list
        /FileFormat=TEMPLATEN2              //Format file name in folder: \AutoCAD_Configs\
        /FileReports=ReportsN2.xml          //Reports template in folder: \ReportsTemplates\
        /FileRests=ReportsRestN2.xml        //Rest files name in folder: \ReportsTemplates\
        /FileMinRests=ReportsMinRestN2.xml  //Minimal plates file name in folder: \ReportsTemplates\
        /FileLogo=LogoN2.jpg                //Logo file name in folder: \ReportsTemplates\
To top.
Q&A->How to create new project.
Nest maker use following directory structure for the projects management:
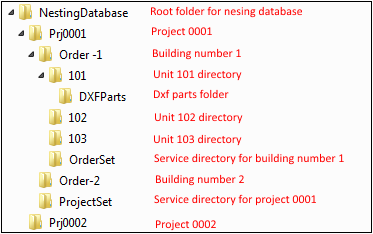
Root folder for nesting database contain all projects and orders. To recognize it as a root folder, name must contain substring "nest".
Next after root folder is a project. Project contain all building numbers and service folder ProjectSet with necessary project settings.
Building numbers contain building units and OrdersSet with order settings.
Unit must have a DXFParts folder inside. In general DXFParts folder can contain sub folders for DXF with different thickness.
To create new project user have to create project folder, order folder and at least one unit folder with DXFParts folder inside. Then run Nest maker and download DXF files.
First time user will get following message:
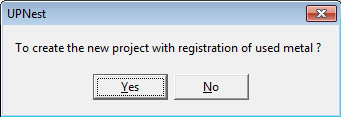
Then if answer yes:
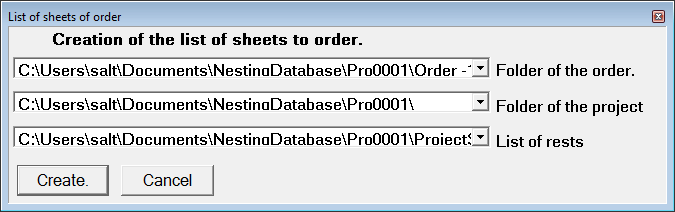
After that all service folders and necessary files will be created and new project will be ready to use.
To top.
About Nest Maker.
Nest Maker – is 2D graphics editor for plate parts nesting, material orders and rests
management, layouts optimization.
Main features:
1. Import DXF parts into layouts database.
2. Parts graphics editor.
3. Parts text and symbols position optimization.
4. Manual and auto nesting plate parts.
5. Material and rests usage control server.
6. Nests correctness control.
7. Multi user client – server architecture.
8. Link to NC Maker for CNC programing tools.
To top.
Main window.
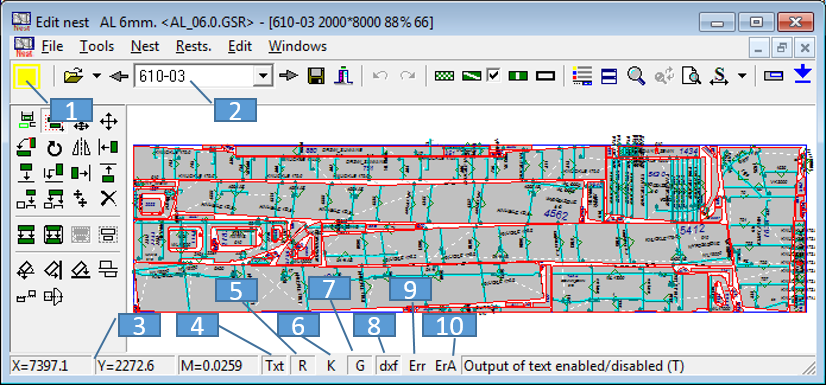
List of important fields of Nest Maker main window:
1. Nest correctness control field.
2. List of available nests.
3. Current cursor position coordinates.
4. On/Off Parts text visualization.
5. On/Off CNC cutting route visualization.
6. On/Off Show bevels.
7. On/Off Show bending direction lines.
8. On/Off Output missing lines (for DXF nests only).
9. On/Off Current nest control.
10. On/Off Current all nests control.
11. List of an open files.
To top.
Edit window.
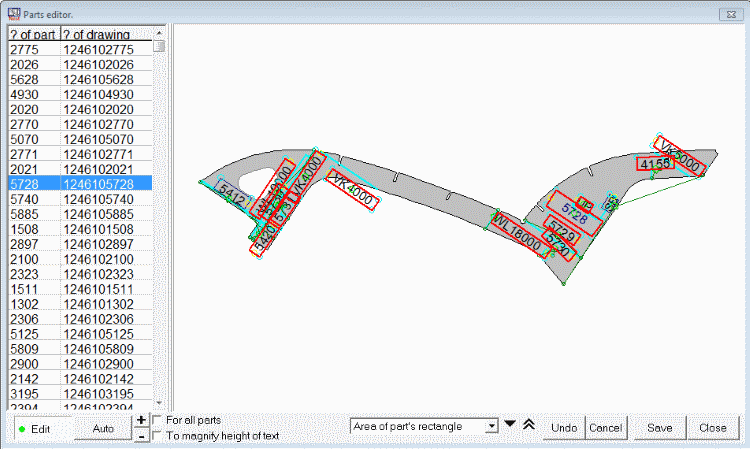
Edit window available by press F4 button. This is on of the important part of the Nest maker.
Very often DXF plate parts having some problems with text hight and text position. Edit window help to fix
most of this problems. User can check part by part from the parts list, edit text position and hight.
In most of the cases Nest maker can fix this in auto mode. User need just list of the parts and check is everything is OK.
Auto mode works better if program can recognize some text as the "special" for example orientation text, beveling information, bending lines and etc.
This text can be fill out in the table see Tools->Tables of text
To top.
Menu.
Nest Maker main menu consist of following items:
File - contain all necessary commands for open close, merge databases and files.
Tools - contain commands for parts editing, material orders, grid setting.
Nest - contain commands for creating and editing nests layouts.
Rests - rests managements commands.
Edit - manual nesting commands
Windows - program windows management commands
To top.
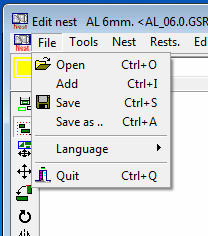
File.
File menu has following options:
To top.
File->Open.
Several different files can be open by this command:
Nested layouts (GSR) – Nest Maker file contains nesting layouts for one
thickness and material quality.
Nested parts group (NC) – DXF file contains a parts layouts.
Parts in DXF - DXF file representation of the plate parts.
To top.
File->Add.
Additional nests layout, parts and nests in DXF can be added by this command to the database:
Parts in DXF – new parts after revision can be added into existing database.
Nested layouts in DXF - nests made in different nesting software or CNC programs converted by NC Maker.
Parts in DXF - DXF file representation of the plate parts.
Nested parts group (GSR) – layouts from another database.
To top.
File->Save.
Save current open Nested parts group (GSR).
To top.
File->Save as.
Save current open Nested parts group as GSR or DXF.
To top.
File->Language.
By this command user can change program language. Up to now program support two languages: English and Russian.
To top.
File->Quit.
Exit from the program.
To top.
Tools.
Tools menu has following options:
To top.
Tools->Undo.
Undo for last changes.
To top.
Tools->Redo.
Cancel of the last Undo command.
To top.
Tools->Distance.
Distance measurement command has following options:
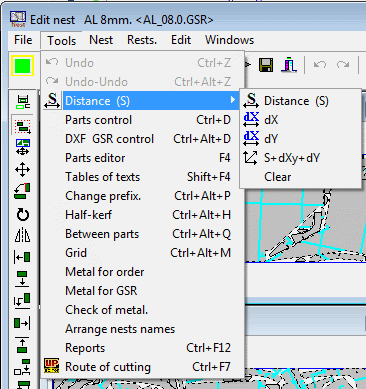
Commands available in the menu let's user make distance measurement, vertical and horizontal distance as well.
To top.
Tools->Parts control.
Part control command used for comparison parts geometry in database with DXF parts in the folder. Checking progress shown by the checking window.
If differences detected Nest Maker will ask to download the new parts into database.
To top.
Tools->DXF GSR Control.
Control parts, nest layouts with layouts in GSR for correctness. Recommended after finish complete nest for one unit.
Nest Maker will create text report of checking results.
To top.
Tools->Tables of text.
The text tables is use to define text for automatically text adjustment.
In the following table user can define text relates to inner or outer contours of the part, flange bending lines, part orientation marks and so on.
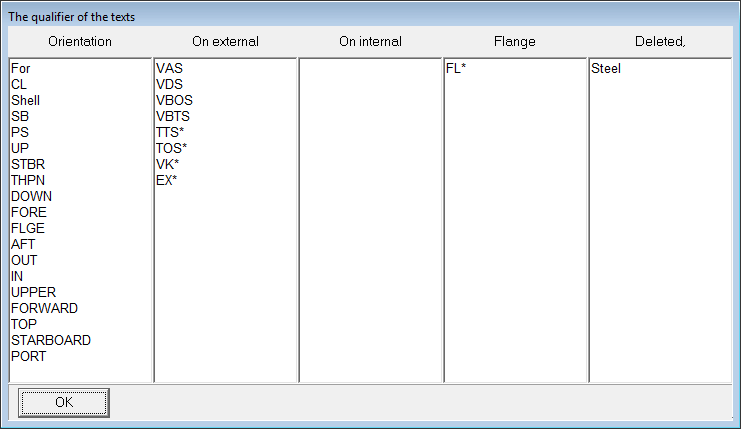
It help to adjust parts texts more correctly.
To top.
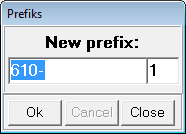
Tools->Change prefix.
This command lets user change prefix for GSR files.
To top.
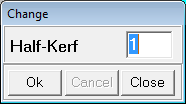
Tools->Half-kerf.
This command lets user change kerf compensation parameter.
To top.
Tools->Between parts.
This command lets user change distance between parts and between part and plate edge.
To top.
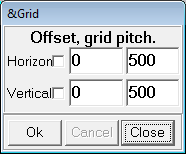
Tools->Grid.
This command lets user set up grid on the gross plate. Grid can be used for exact positioning of the parts.
To top.
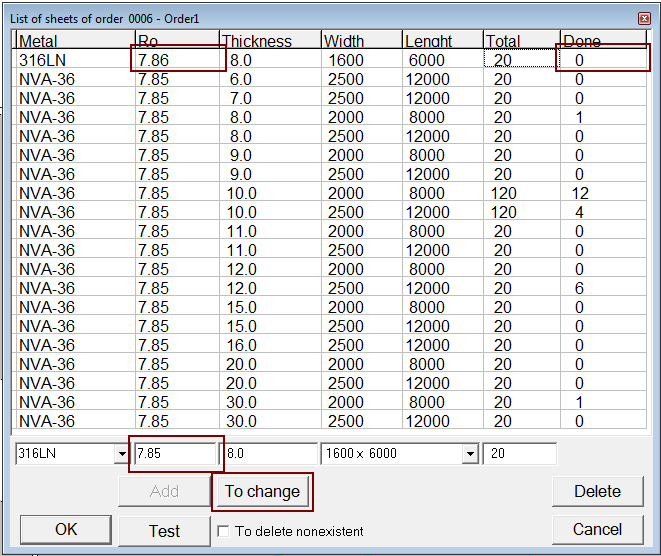
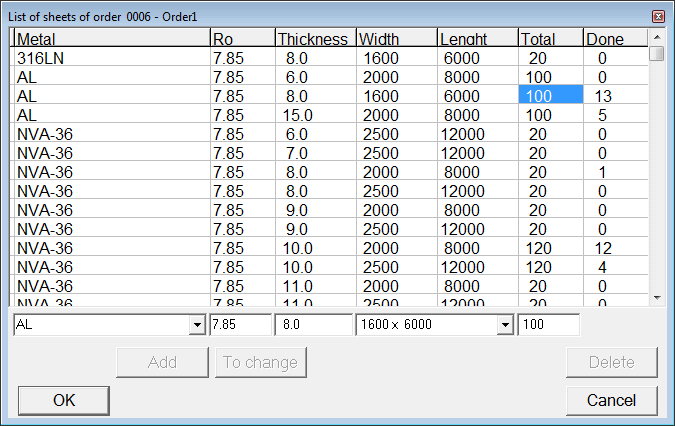
Tools->Metal for order.
By this command user can manage material usage for one building order.
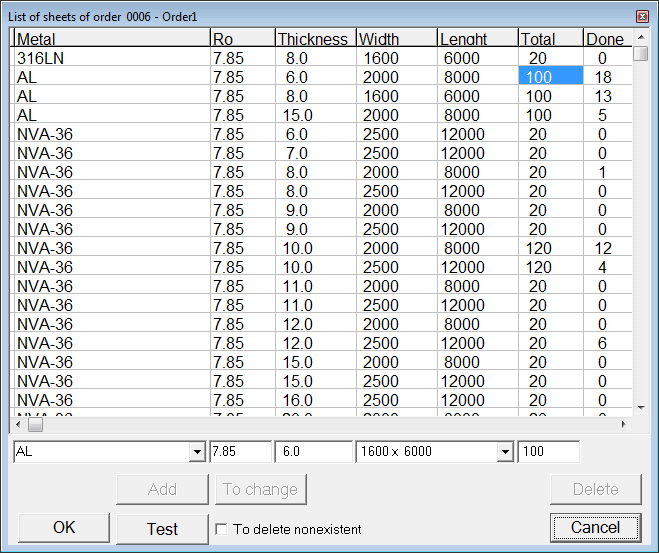
Note: To add new type of material or different plate's size use ADD button. This button will be available only with non zero quantity field.
To top.
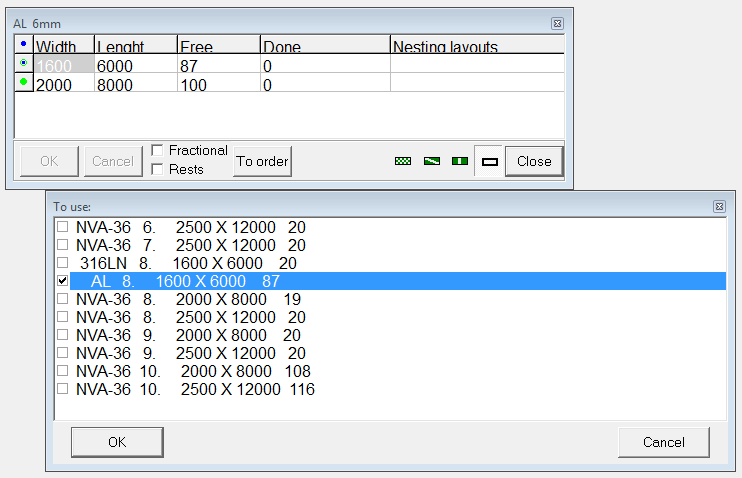
Tools->Metal for GSR.
By this command user can manage material usage for current GSR: change plates order for auto nesting, allow program use another material and thickness for nesting.
To top.
Tools->Check of metal.
By this command user can check material usage for all order.
To top.
Tools->Arrange nest name.
By this command user rename nests for the unit.
To top.
Tools->Reports.
This command will generate report for the unit.
To top.
Tools->Route of cutting.
This command will run NC maker for CNC route programming.
To top.
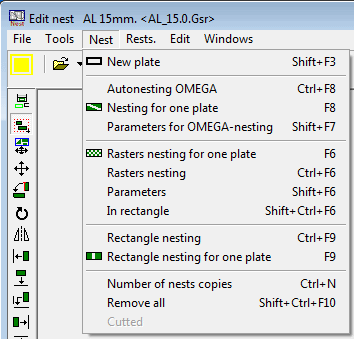
Nest.
Nest menu has following options:
To top.
Nest->New plate.
This is used to start nesting for new plate. Plate dimension will be taken from available gross plates list. To get information about available plates check Tools->Metal for GSR.
To top.
Nest->Autonesting Omega.
Currently is not supported.
To top.
Nest->Nesting for one plate.
Currently is not supported.
To top.
Nest->Parameters for Omega nesting.
Currently is not supported.
To top.
Nest->Rasters nesting for one plate.
This command run rasters auto nesting for one plate. Plate will be taken from list of the available plates.
To get information about available plates check Tools->Metal for GSR.
Process will stop when no more available parts suitable for nesting. Auto nesting process also can be stopped by user
(button Stop in upper left corner of the window). During auto nesting process user can continue to work with the program.
Make manual nesting for another plate for example.
To top.
Nest->Rasters nesting.
This command run rasters auto nesting for all available parts and all available plates. Plates will be taken from list of the available plates
in according to available lists order. Rests can be also added to the order.
To get information about available plates check Tools->Metal for GSR.
Process will stop when no more available parts suitable for nesting or no more plates available. Auto nesting process also can be stopped by user
(button Stop in upper left corner of the window). During auto nesting process user can continue to work with the program.
Make manual nesting for another plate for example.
To top.
Nest->Parameters.
Auto nesting parameters can be set in the following menu:
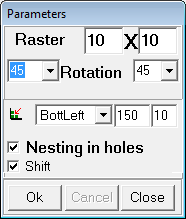
User can change following parameters:
- raster representation of the part. Default value is 10 mm. Auto nesting can be more precise with value for example 5mm, but it will take more time for nesting process.
- number of possible parts rotations. To get an optimal position on the nest, parts can be rotated. Default rotation angle 45 deg. it means that parts will have 4 possible rotations.
- shift to low left corner. Due to of the raster parts representation distance between parts can be more than specified in the project.
This option shift current nested part to left lover corner up to minimal distance between parts.
Rest of parameters is used only for compatibility with Omega autonesting.
To top.
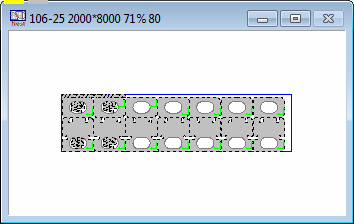
Nest->In rectangle.
Special rectangle area of the plate for auto nesting.
In this case auto nesting will try to find optimal parts position only inside the selected rectangle.
Selected area for auto nesting.
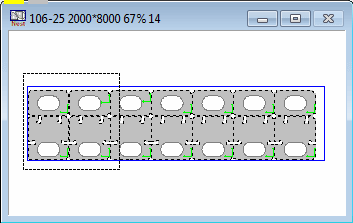
Auto nesting results.
To top.
Nest->Rectangle nesting.
Sometime if there is a lot of rectangle parts in the nest user can try rectangle nesting. It is very simple, but very fast.
All parts represented as rectangles and nested just in according of the dimensions. This function will nest available
parts on all available plates from the material list.
To top.
Nest->Rectangle nesting for one plate.
It is similar to Nest->Rectangle nesting, but only for one plate.
To top.
Nest->Number of nest copies.
This command will detect similar nests and remove all replicas.
To top.
Rests.
Rests menu has following options:
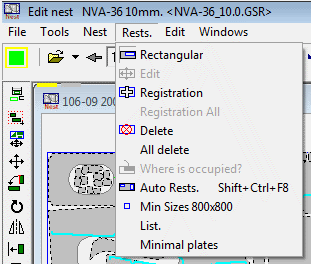
To top.
Rests->Rectangular.
This command allow user to define rectangle rest material from nest layout. Rest dimensions can be inputed from keyboard or by mouse.
To top.
Rests->Edit.
This command allow user to change dimensions of not registered rest by mouse.
To top.
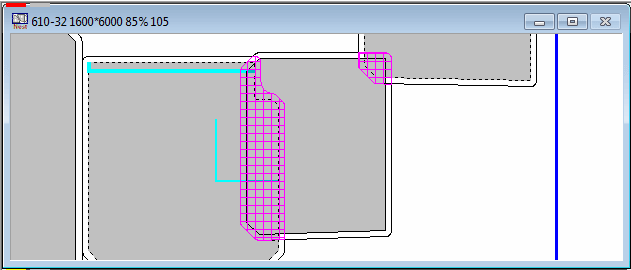
Rests->Registration.
This command allow user to register the rest in the list of available rests.
It can be perform only if there is no nesting errors on layouts.
Registered rest will be marked by diagonal hatching
To top.
Rests->Registration all.
This command allow user to register all rests at same time in the list of available rests.
It can be perform only if there is no nesting errors on layouts.
Registered rest will be marked by diagonal hatching
To top.
Rests->Delete.
This command delete rest form the layout if rest is not registered yet. If rest is registered, this command will cancel rests registration.
Cancellation of the registration for used rests is not permitted.
To top.
Rests->Where is occupied.
This command will download nest layout where selected rest is used.
To top.
Rests->Auto rests.
This command will check all layouts and make rests for not used areas bigger than minimal rest dimensions in Rests->Min size.
To top.
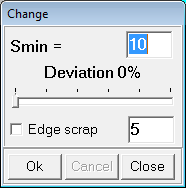
Rests->Min size.
This command is used to set up minimal rests dimension in following menu:

To top.
Rests->List.
This command will generate Excel table for the available rests.
To top.
Rests->Minimal plates.
This command will generate Excel table for the available minimal plates.
To top.
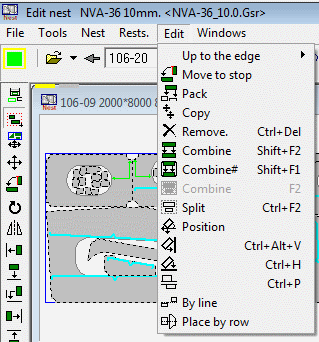
Edit.
Edit menu is used to manual correction of the parts layouts and has following options:
To top.
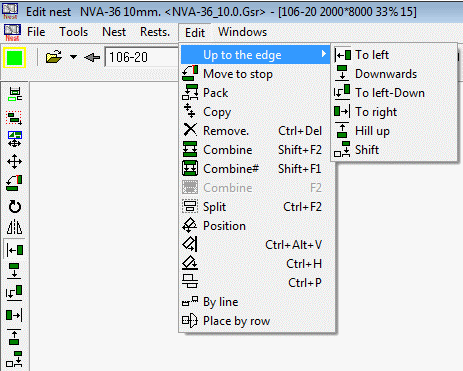
Edit->Up to the edge.
This command is used to shift parts in selected direction as far as possible. Select one of the sub menu item, then select part you want to move.
To top.
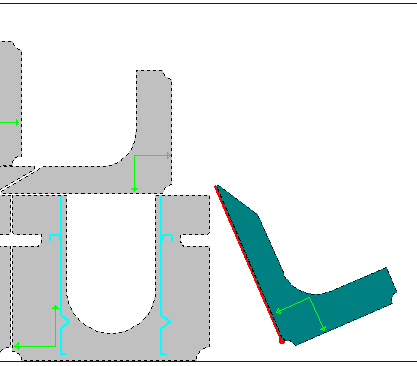
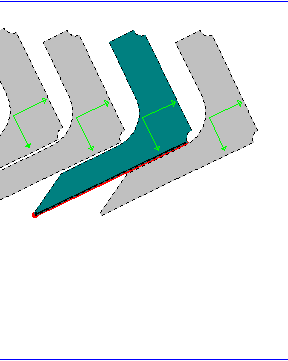
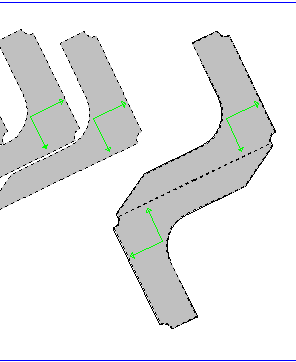
Edit->Move to stop.
This command help to combine to parts by selected edge. Select edge of the part to move (Edge will be marker by red color ). Then select edge you want to combine.
Before:
After:
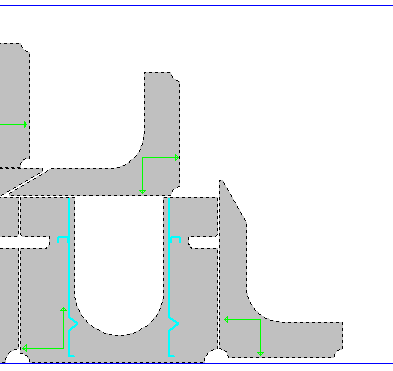
Note! Begin point of the selected edge will corresponding to begin point of the combined edge.
To top.
Edit->Pack.
Pack command will try to fit selected part in selected direction by shifting and rotation at the same time.
To top.
Edit->Copy.
Copy command is used for copy of the nested parts.
To top.
Edit->Remove.
Remove command is used for deleting part from nest. It is not mean the part will be deleted from data base.
Deleted part will return to the not nested parts list.
To top.
Edit->Combine.
Combine parts by common edge. The parts will have common edge for cutting both edges at the same time.
Before:
After:
To top.
Edit->Combine#.
Combine# similar to combine, but combined parts will be joined into block and will be selected and moved together.
To top.
Edit->Split.
Split selected block into separate parts.
To top.
Windows.
Windows menu is used to manage different program windows and has following options:
To top.
Windows->Where is error.
As result of this command program will zoom into area where is collision between parts happen.
To top.
Windows->Parts.
This command show parts list window.
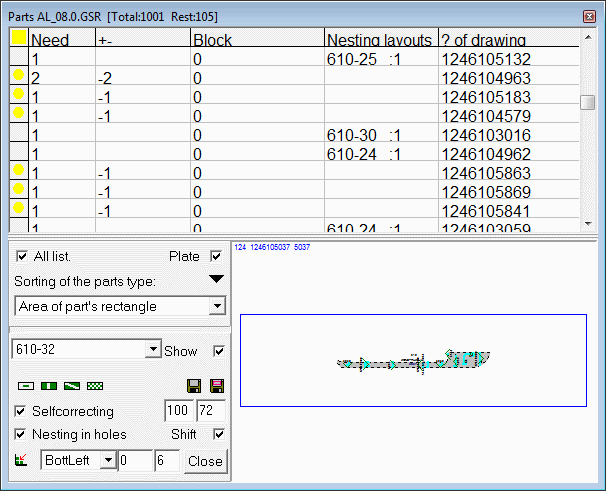
Parts list window is a main tool for parts management.
Table in upper part of the window show parts quantity, dimension and other parameters. Part's information condition shown in most left column.
Parts list is can be used for changing parts parts's attributes and position in the parts list. Parts list position is most important for correct auto nesting.
For manual nesting just drag and drop part selected in the list to nest layout.
The dialog below consist of following parameters:
On/Off All lists - show all parts in GSR or only not nested parts.
On/Off Plate - show part in preview window in the gross plate scale or fit to the window
Sorting of the parts type: - different variants of the part's list sorting for the auto nesting.
List of the available layouts - switch between available layouts.
On/Off Show - highlight current selected part position on the layout.
Add parts to layout:
- in the middle of the layout - suitable for big plates like shell plates, if it's only one part for the layout.
- rectangle nesting - simple, but very quick algorithm for rectangular parts.
- autonesting Omega - using auto nesting omega for find part position.
- raster autonesting - using raster auto nesting for find part position.
On/Off Selfcorrecting - correcting part position after manual placing. Addition parameters shown radius, and number of possible rotations for part.
On/Off Shift - shift the part to low left position after autonesting.
To top.
Windows->Materials.
This command show materials list window available for the current GSR.
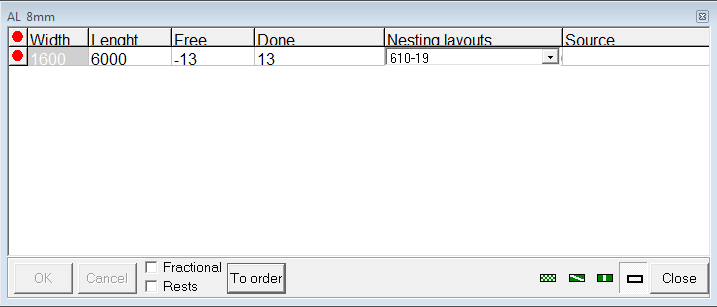
Materials list window is a main tool for material management.
Auto nesting algorithm start to use plates dimensions from first record in the list.
If no more available plates it's comes to the second string and so on.
The dialog consist of following parameters:
On/Off Fractional - use %of the gross plate.
On/Off Rests - use available rests.
To Order - open material window list for order Tools->Metal for order.
To top.
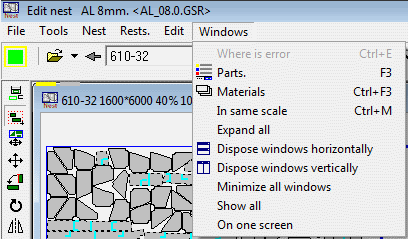
Windows->In same scale.
This command will redraw all layout's windows in the same scale. This option quite useful if you need to find some space for the part from one of the layouts.
To top.
Nest Maker release and development history.
08.04.16 Extented nesting commands added.
08.12.15 Nupas style beveling information import added.
06.03.15 Testing parts import from NX Siemens structure modeling software.
18.10.14 Parts nesting interface improved.
14.08.14 Parts nesting control.
20.06.14 XLS book generation for unit.
28.04.14 Nest Maker new release now available.
20.03.14 User settings synchronization for project.
05.02.14 Nupas DXF parts import improved.
25.02.14 I&V Bevels recognizing during DXF parts import.
20.01.14 Export nests numbers into Nupas.
21.11.13 Link to Nupas-Cadmatic database via XML interface.
09.09.13 New menu and improved functionality for manual nesting parts.
13.08.13 Group of parts for manual nesting implemented.
23.07.13 Auto nesting in selected areas.
11.05.13 New auto nesting algorithm implemented.
28.03.13 Nest Maker new release now available.
19.02.13 Export reports to EXCEL implemented.
15.02.13 Parts text auto adjustment.
11.02.13 Common material usage and rest system support for project.
To top.